Local development
Using Visual Studio Code, the Python SDK and Rerun on a NOVA cloud instances is a good starting point for building your first robotic programs. However as you progress, more complex robotic programs including communication with external systems, advanced pathplanning and custom user interfaces are required.
Set up local environment
Working locally has the following advantages: you can use the full power of your own computer, stay in your favorite IDE, keep everything on your company network, and keep working when you’re offline.
However, this approach requires more technical knowledge, so only dive into this part if you’re comfortable with
- Setting up a local environment setup, and
- Configuring and installing all necessary tools.
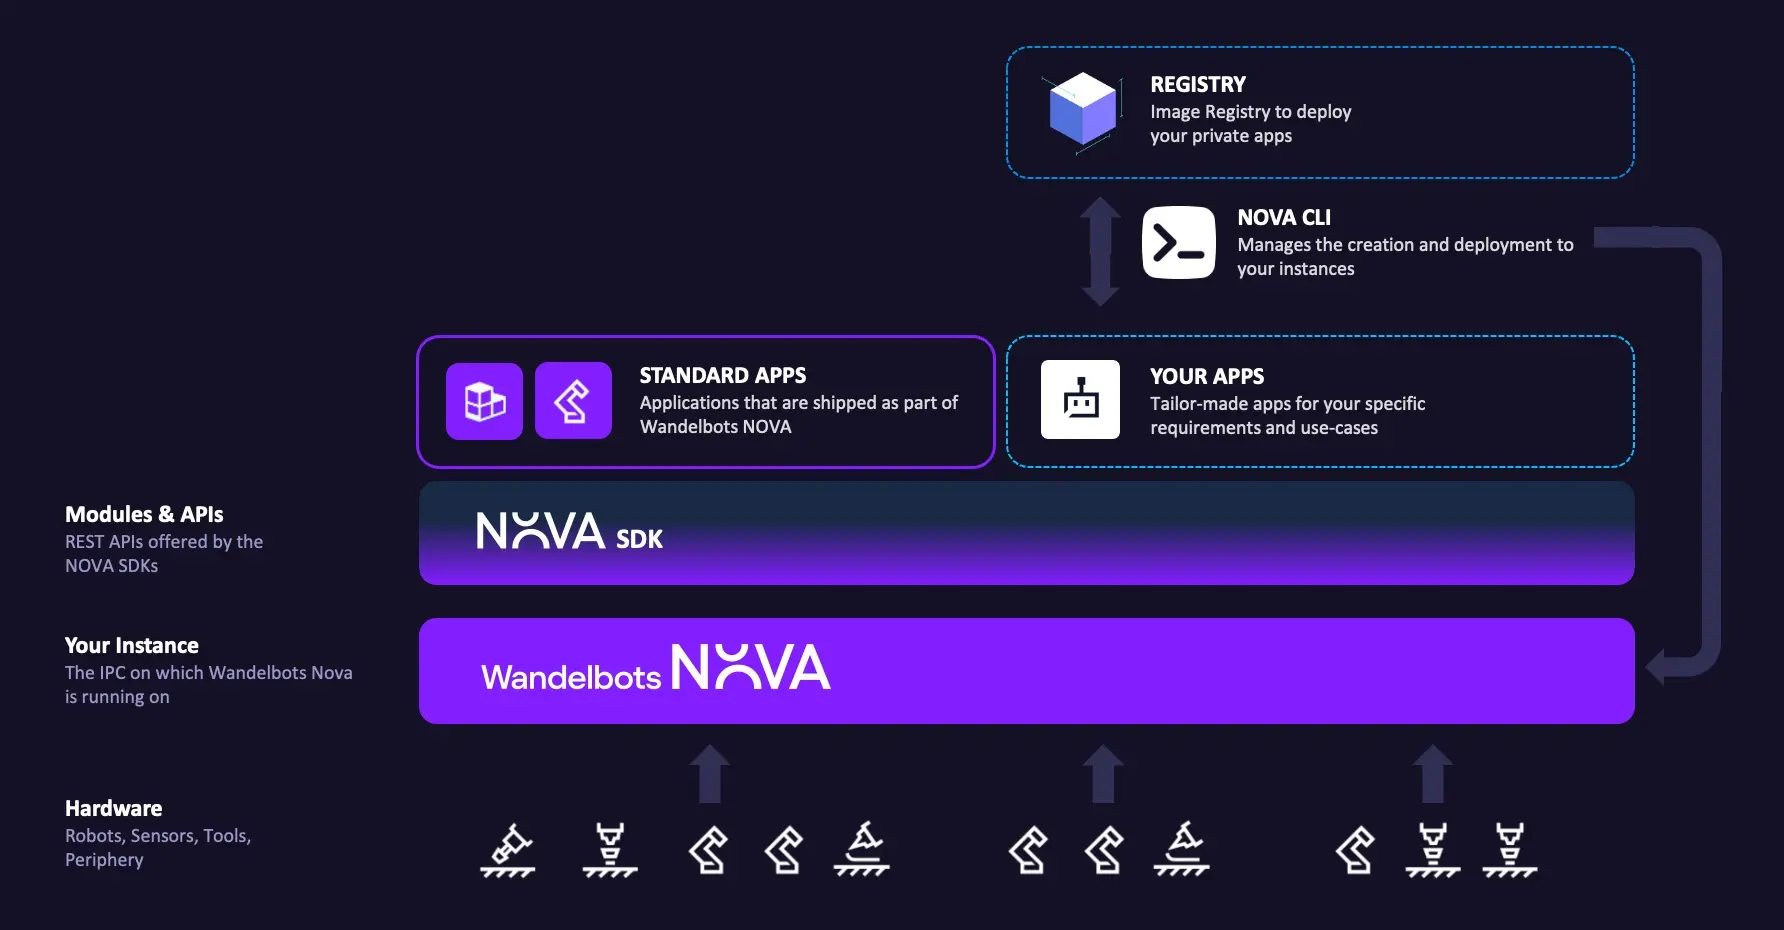
Wandelbots NOVA provides a platform to develop, deploy, and manage custom applications for controlling robots. You will build applications locally using the Wandelbots NOVA Python SDK, push your app to a registry, and deploy it to your Wandelbots NOVA instance using the NOVA CLI.
Prerequisites
You completed the Wandelbots NOVA quickstart guide and have a NOVA cloud instance running including a robot.
Set Up Docker and Registries
NOVA applications are deployed as Docker containers. You’ll need Docker installed locally and access to an OCI registry such as Docker Hub.
Install Docker and create account
Install Docker Desktop (or Docker Engine) and create an account on your preferred OCI registry.
Log in to registry
Open your terminal and input the following command. This will allow Docker to push images to your registry:
docker login --username MY-DOCKER-USERNAME MY-REGISTRYIf you’re using Docker Hub, the registry value is typically registry-1.docker.io/MY-DOCKER-USERNAME.
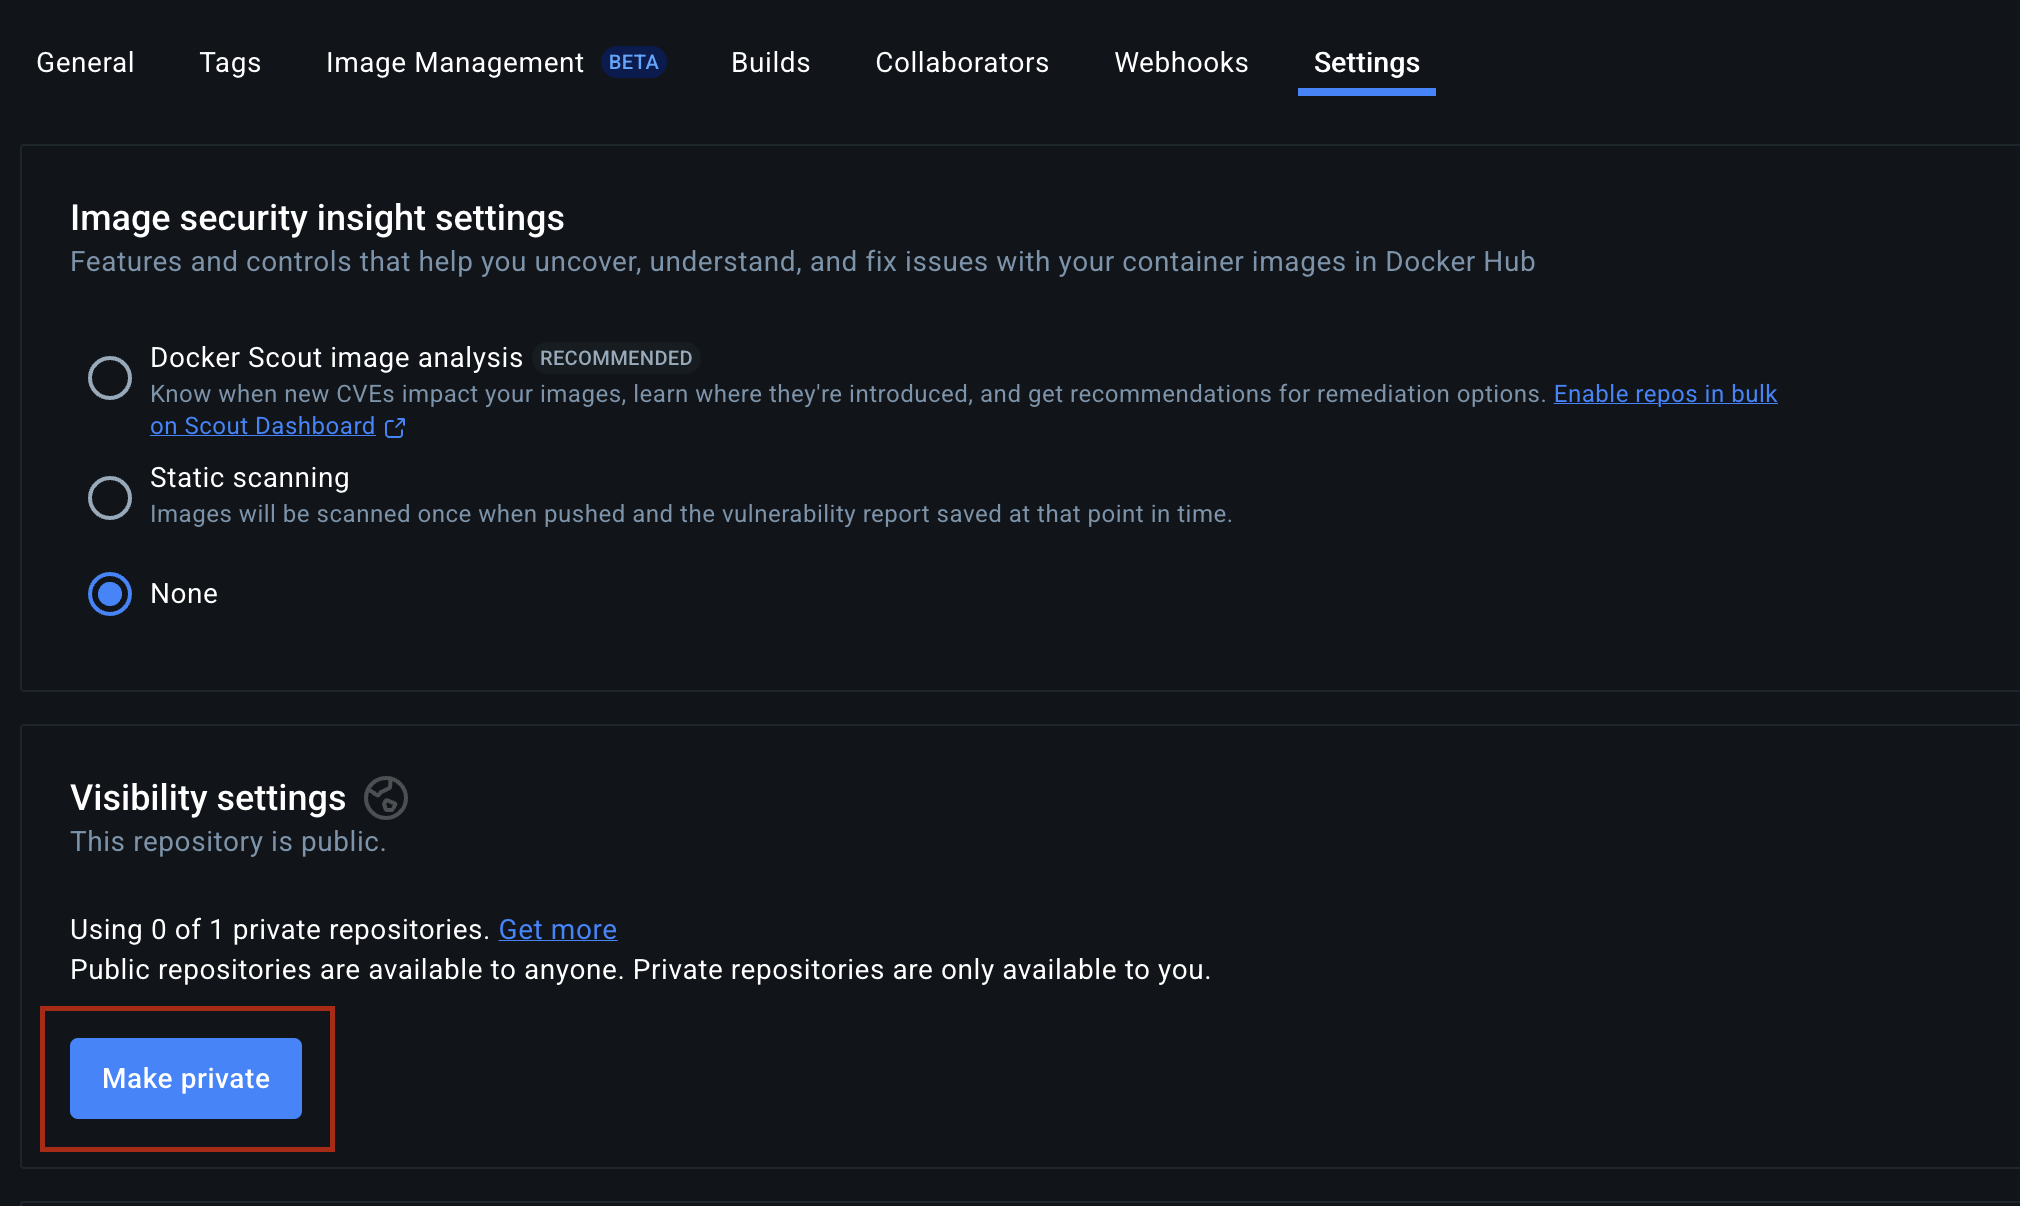
Update repository visibility in Docker
By default, repositories created on Docker Hub are public. If you want to keep your images private, open the repository settings and change the visibility as shown below.
Private repositories ensure that only authenticated users can pull your app image.
NOVA CLI Installation
The NOVA CLI is a command-line tool for creating applications and deploying them to Wandelbots NOVA.
It includes many additional features that you can explore on GitHub or after installation by running nova --help.
macOS/Linux
Install the Wandelbots NOVA CLI tool using Homebrew .
brew install wandelbotsgmbh/wandelbots/novaEnable autocompletion for zsh.
echo 'source <(nova completion zsh)' >> ~/.zshrcTo see all available autocompletion commands for other shell types, run:
nova completion --helpManual installation
Download the Wandelbots NOVA CLI tool and configure it in your local environment.
Rename the downloaded file to nova and make it executable.
Grant the file execution permissions, as the program is not signed.
In order to ensure a smooth process, add the Wandelbots NOVA CLI to your terminal’s path.
The exact process depends on your operating system and terminal.
Set up CLI
Once you have the CLI installed, the first step is to specify the NOVA instance you’re using.
If you don’t specify a host, the CLI will default to using a local instance.
Physical instance or VM
Deploying to a physical controller or virtual machine in your network typically relies on IP connectivity.
Set the host of your NOVA instance:
nova config set host 192.168.1.100Provide additional authentication details if your instance requires them.
Set image registry
If you are not planning to install your app, you can skip this step.
Now, configure the NOVA CLI to specify where to push your Docker images. This registry will also be used by your NOVA instance to pull the images.
nova config set image-registry MY-REGISTRYCreate an app
Now that you have everything installed and configured, let’s create an app.
Create project with Python template
nova app create myappThe CLI creates a standard Python project that uses uv for dependency management and FastAPI for the HTTP interface.
Default FastAPI routes expose your robotics programs without any extra wiring,
and you can extend them whenever you need to customize the API.
Below are some helpful uv commands:
# Create the environment and install dependencies
uv sync

# Add a new dependency
uv add some-package
The template is optimized for GitHub Copilot and ships with prompts you can reuse:
local_setupchecks local prerequisites and tooling.new_programbootstraps robotics programs that follow the Python SDK patterns.start_serverstarts the development server.test_programruns a selected program.deploy_appwalks you through publishing to NOVA.copilot-instructions.mddocuments the project structure and collaboration tips.
Check the official visual studio code documentation to learn more about this feature.
Copilot accelerates the workflow, but it can also introduce incorrect or overly complex code. Knowing Python fundamentals makes it much easier to review Copilot’s suggestions and catch issues early.
Update .env file
When working with any project you created with NOVA CLI, you need to make sure the .env file is updated. The following information is needed in the .env file:
- NOVA_API: this is your NOVA HOST. If you have an instance from our cloud, you should put xxxxx.instance.wandelbots.io
- CELL_ID: every NOVA application exists in a cell. When you get started, you will have only one cell which is named
cell. - NOVA_ACCESS_TOKEN: This is the access token you can get from our developer portal. Only set this if you are using an instance from the cloud.
- NATS_BROKER: You don’t need this if you are using the cloud, as it is automatically created for you. But if you are using NOVA in an IPC or in a virtual machine, it should be set up like this
ws://IP:80/api/nats
Start app
Start your app by running
uv run python -m myappThen, open the browser and see the API.
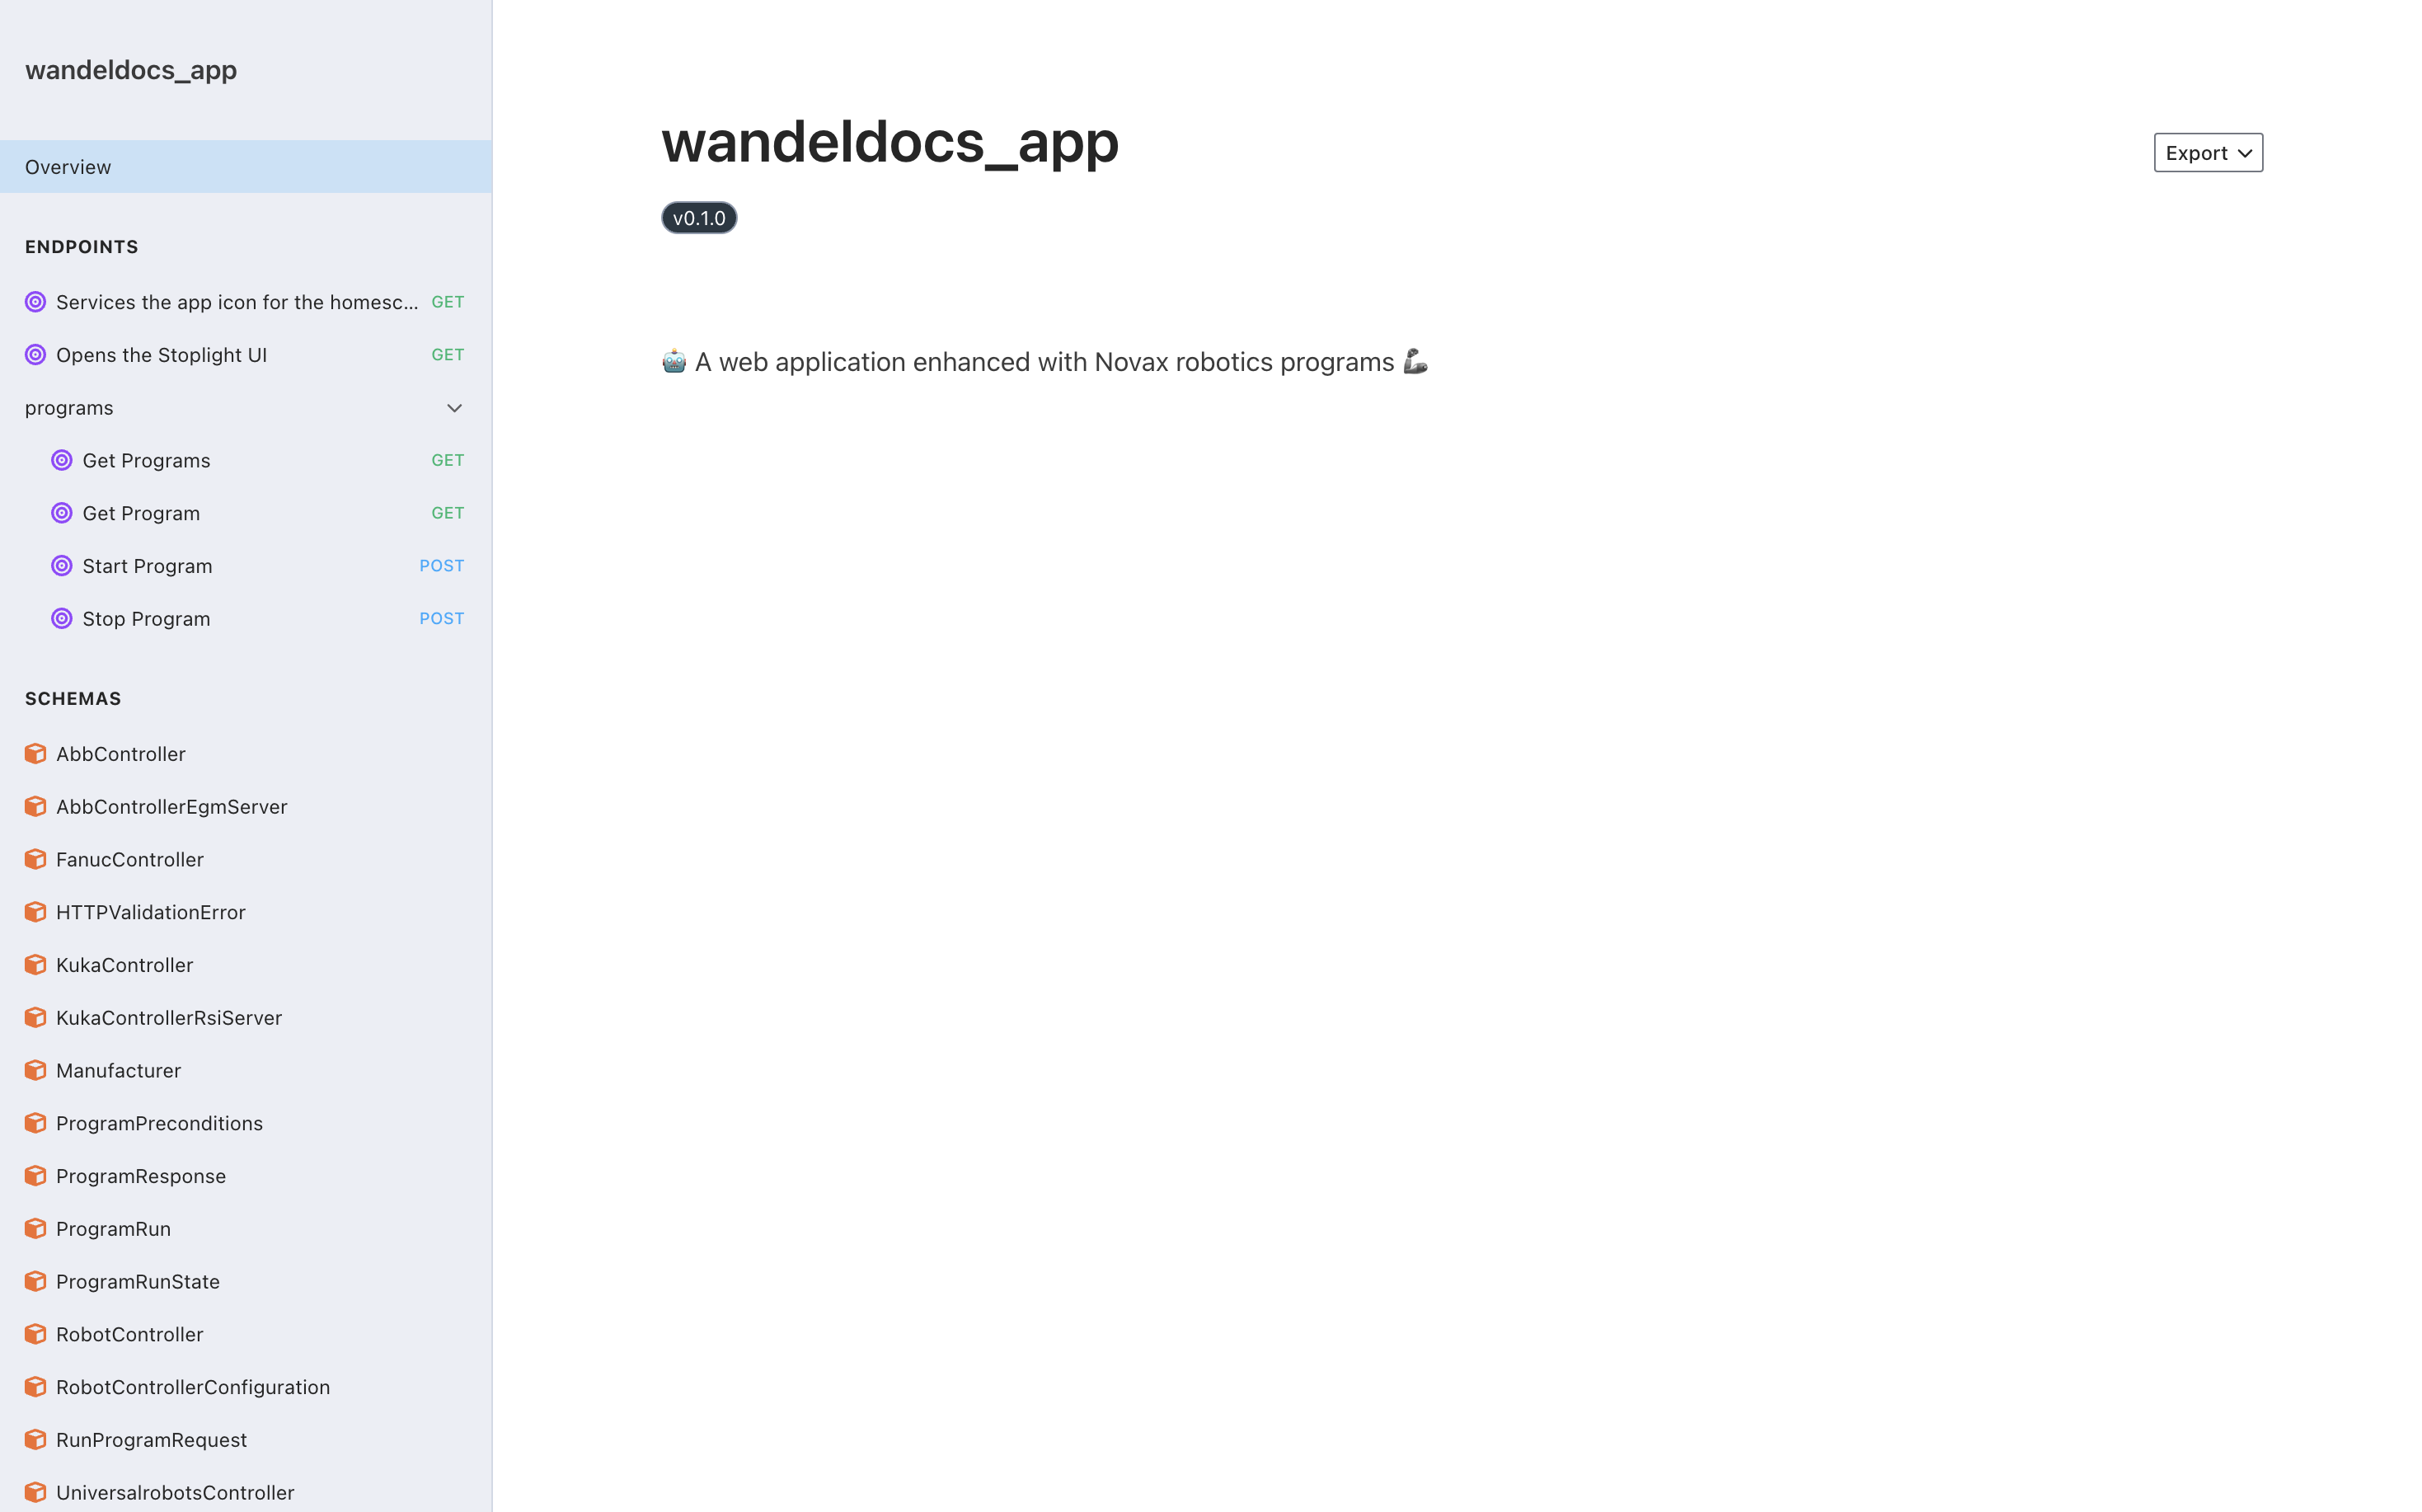
As you can see you got a couple of APIs out of the box. These APIs are integrated to our system and when you write robotic programs they will automatically be integrated with these APIs.
If you want to extend the project no worries. We only register some routes to your API, you still have the full flexibility to implement new APIs and own the FastAPI object.
Deploy app
Now that your app is up and running, you can deploy it by running this command.
nova app install myappVerify app installation
After your app is installed, go to the home screen and make sure the app is visible.
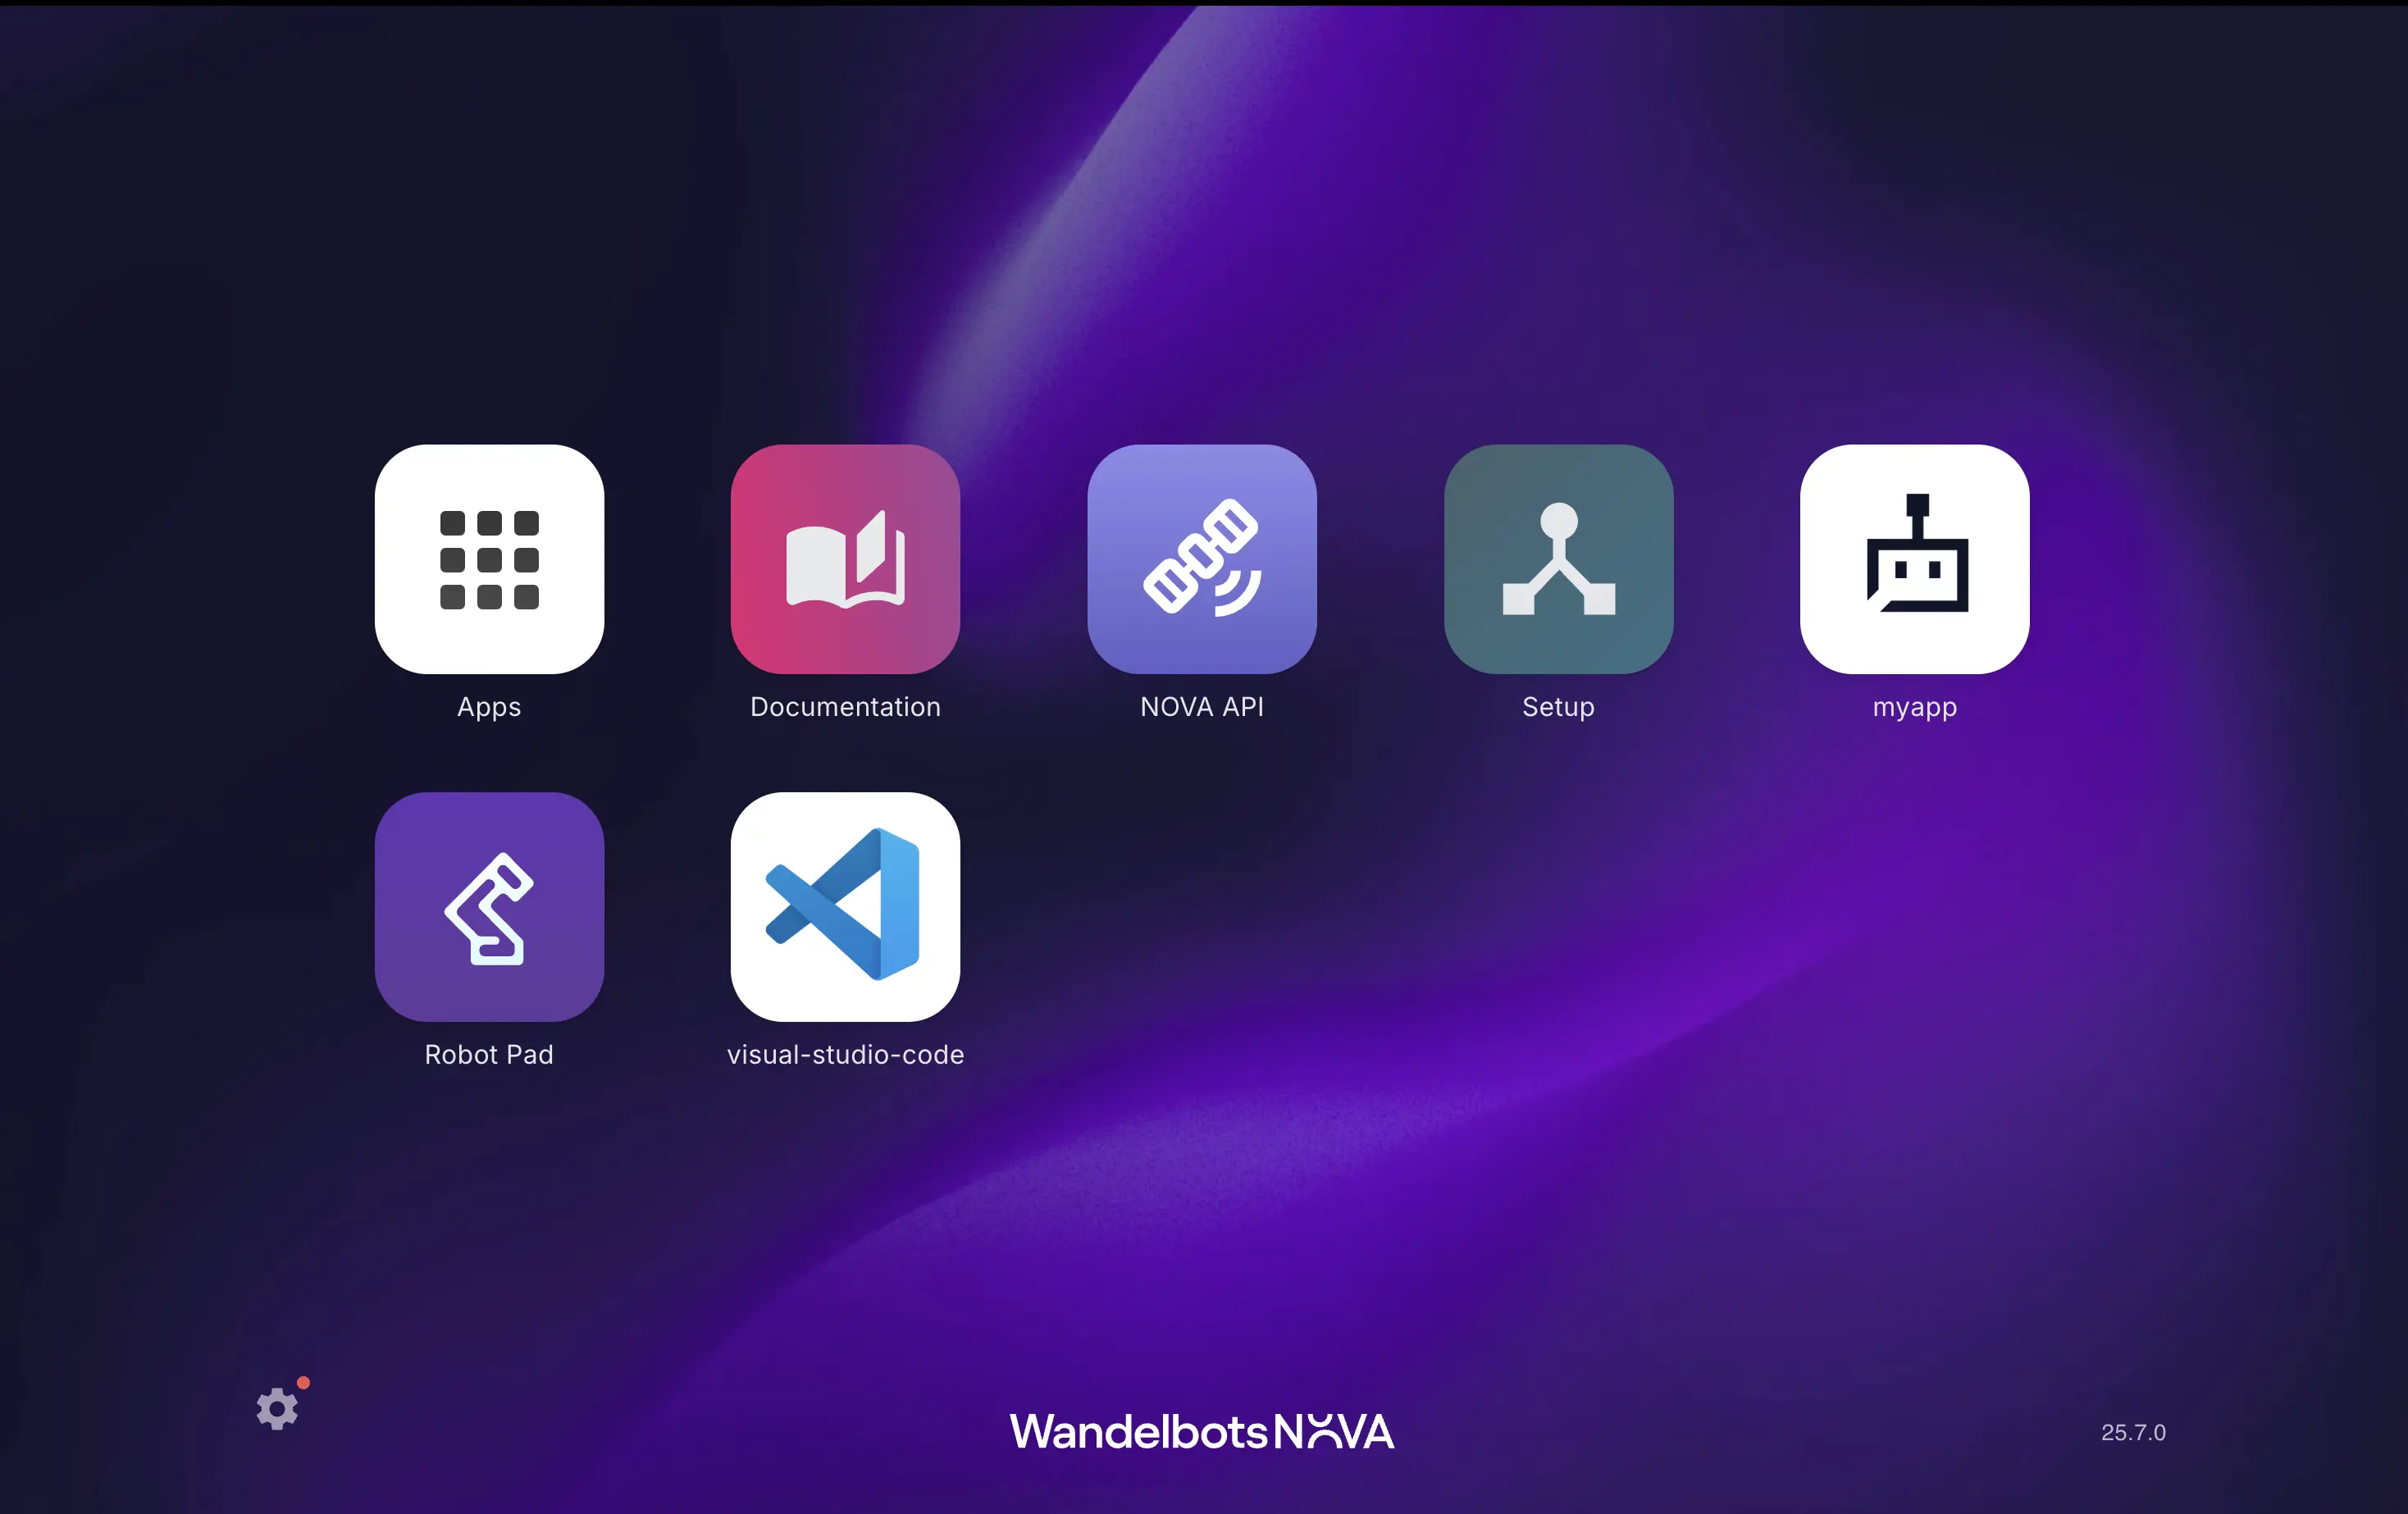
You can customize the icon by changing the app_icon.webp in the auto generated project.
NOVAx programs
NOVAx is an app framework provided by the Python SDK for building server applications on top of Wandelbots NOVA. It provides common core concepts like the handling of robot programs and their execution.
Starter programs
When you create a NOVAx app template, you’ll find a programs folder that comes with two example programs by default:
start_here.py- This is a Python program that demonstrates the basic structure and patterns for robotics programming using the Python SDK.hello_world.ws- This is a Wandelscript program that showcases the Wandelscript programming approach.
We are currently in a transition period from Wandelscript to Python. If you have existing Wandelscript programs, you can bring them to your NOVAx templates and gradually migrate them to Python as needed. While Wandelscript programs will continue to work, we recommend prioritizing Python for new development.
Migrating Wandelscript to Python programs
To migrate your Wandelscript programs to Python, you have to be familiar with Python and have to have built and deployed an app on Wandelbots NOVA.
NOVAx supports both programming approaches and a hybrid approach to allow you to migrate your programs gradually.
Since both programming approaches are supported, you can:
- Start with existing Wandelscript programs - Copy your
.wsfiles into theprogramsfolder and register them to NOVAx in theapp.py:
novax.register_program(wandelscript_program)-
Gradually migrate to Python - Use the
start_here.pyas a reference to understand the Python SDK patterns and convert your Wandelscript logic piece by piece. -
Mix both approaches - Run Wandelscript and Python programs side by side during your transition period. You can take advantage of foreign function interface of Wandelscript to have a seamless integration between Python and Wandelscript.