Poses
Poses represent the position and orientation of an object in 3D space. They are fundamental in robotics as they allow you to define and manipulate the spatial configuration of objects.
Define a pose in Wandelscript as a tuple of 6 elements: (x, y, z, rx, ry, rz). Each value is a floating point number.
pose = (1, 2, 3, 0.4, 0.5, 0.6)The first three elements x, y, z represent the position of the object in 3D space, while the last three elements rx, ry, rz represent the orientation of the object in 3D space.
The orientation (<position>, rx, ry, rz) is defined as a rotation vector. rx, ry and rz are specified as radians.
The rotation is represented in vector3 using an axis-angle representation: axis.normalized * angle (angle in radians).
Concatenate poses
Pose concatenation combines two poses into a single pose that represents the cumulative effect of both transformations applied sequentially.
:: will apply the second pose relative to the first pose's coordinate frame. The concatenated pose is the result:
result_pose = first_pose :: second_poseCombine two simple poses to understand how the :: operator works.
# Define the first pose
pose1 = (0, 0, 5, 0, 0, 0)  # Positioned at (0, 0, 5) with no rotation

# Define the second pose
pose2 = (1, 2, 3, 0, pi, 0)  # Positioned at (1, 2, 3) with ry = pi

# Concatenate pose1 and pose2 to pose3
pose3 = pose1 :: pose2

# Output the result
print(pose3)  # Output: (1.0, 2.0, 8.0, 0.0, pi, 0.0)

# Order of concatenation is important
pose4 = pose2 :: pose1

print(pose4) # Output: (1.0, 2.0, -2.0, 0.0, pi, 0.0)- Pose 1 moves 5 mm along the z-axis with no rotation.
- Pose 2 moves 1 mm along x, 2 mm along y, and 3 mm along z, with a 180-degree (π radians) rotation around the y-axis.
- Pose 3 is the result of applying
pose2in the coordinate frame defined bypose1.
Calculating of the position for pose3:
x = 0 + 1 = 1
y = 0 + 2 = 2
z = 5 + 3 = 8
Calculating the orientation for pose3:
rx = 0 + 0 = 0
ry = 0 + π = π
rz = 0 + 0 = 0
Transformation order matters
Transformations are applied in the indicated order of the concatenation. The result of pose2 :: pose1 is different from pose1 :: pose2. Here's why:
- Different coordinate frames: When concatenating
pose1 :: pose2,pose2is applied within the coordinate frame defined bypose1. Withpose2 :: pose1,pose1is applied within the coordinate frame ofpose2, which is rotated byπradians around the y-axis. - Rotation effects: In
pose4, the rotation ofpose2affects the position ofpose1when applied. The 180-degree rotation flips the z-axis, causing the z-coordinate to be negative after concatenation. - Non-commutative operation: Pose concatenation is not commutative
(A :: B ≠ B :: A).
But concatenation is also associative, meaning (pose1 :: pose2) :: pose3 is the same as pose1 :: (pose2 :: pose3).
Since pose2 has a rotation, we need to rotate the position of pose1 (0, 0, 5) by applying the orientation of pose2.
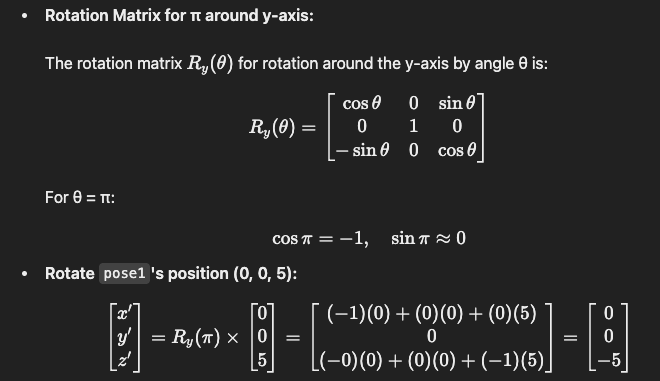
This calculation is AI generated.
With the rotation applied, the new position is (1, 2, -2) calculated as following:
x = 1 + x` = 1 + 0 = 1
y = 2 + y` = 2 + 0 = 2
z = 3 + z` = 3 + (-5) = -2
and the orientation is (0, π, 0) calculated as following:
rx = 0 + 0 = 0
ry = π + 0 = π
rz = 0 + 0 = 0
The result is (1, 2, -2, 0, π, 0).
Chain concatenation
Concatenate multiple poses to create complex transformations.
Define a base pose as the starting position:
base_pose = (0, 0, 0, 0, 0, 0)Define the following additional poses:
- Move forward by 5 mm,
- Rotate by -90 degrees around the z-axis, and
- Move up 2 mm along the z-axis.
move_forward = (5, 0, 0, 0, 0, 0)        # Move 5 units forward
rotate_right = (0, 0, 0, 0, 0, -pi/2)    # Rotate 90 degrees to the right
move_up = (0, 0, 2, 0, 0, 0)             # Move 2 units up
Now concatenate the poses:
combined_pose = base_pose :: move_forward :: rotate_right :: move_upDon't forget to print the result:
print(combined_pose)The concatenated and printed pose is (5.0, 0.0, 2.0, 0.0, 0.0, -1.571).
Invert poses
~ is used to invert a pose. The indicated position and orientation components are negated.
inverse_pose = ~poseTransform a positions or pose from one coordinate frame to another:
pose = (1, 2, 3, 0, pi, 0)
inverse_pose = ~pose
print(inverse_pose)
The inverted and printed pose is (-1.0, -2.0, -3.0, 0.0, -3.14159, 0.0).
Transform position to different coordinate frame
Lets first define a position, position_of_a_in_world, of object a. The position is given by three coordinates x, y, z in a frame of reference. When there is no other relation given, we assume that the frame of reference is the world frame of reference (0, 0, 0, 0, 0, 0).
The position is (1, 2, 3)
position_of_a_in_world = (1, 2, 3)Typically the robot base is mounted at a specific pose in the world frame of reference.
Its pose is (30, 20, 10, 0, 0, 0).
pose_of_robot_in_world = (30, 20, 10, 0, 0, 0)We want to know the position of object a in the robot frame of reference.
For that we have to invert the robot's pose and then transform the object's position from the world frame to the robot frame.
Use ~ to invert the robot's pose in world. Then transform with ::. Don't forget to print the position of object a!
position_of_a_in_robot = ~pose_of_robot_in_world :: position_of_a_in_world
print(position_of_a_in_robot)
The transformed position of object a in the robot frame of reference is (-29, -18, -7).
Example
Use pose concatenation to simulate a robotic arm picking up an object and placing it in a new location. The following code was tested on a virtual UR10e robot with the controller name ur10e.
# Define the robot controller and motion group. Replace <controller_name> and <motion_group> with actual values.
robot = get_controller("ur10e")[0]
home = (-91.4, -662, 851.3, -6.6849, -6.6847, 1.1158)

velocity(800)

# Define the pose to reach the object
pick_pose = (-200, -500, 400, 0, pi, 0)

# Define the pose to pick up the object (e.g., lower the arm)
height_offset = (0, 0, -100, 0, 0, 0)  # Offset of 100 mm along z-axis

# Define the pose to place the object (e.g., open gripper)
place_pose = (-400, -500, 400, 0, pi, 0)

move frame("Flange") via p2p() to home

# First move a bit above the pick pose to ensure a linear motion
move frame("Flange") via p2p() to pick_pose :: height_offset
move frame("Flange") via line() to pick_pose
move frame("Flange") via p2p() to pick_pose :: height_offset

sync
wait 1000

# Move to place pose
move frame("Flange") via p2p() to place_pose :: height_offset
move frame("Flange") via line() to place_pose
move frame("Flange") via p2p() to place_pose :: height_offset
wait 1000

move frame("Flange") via p2p() to home